
Xml日志记录文件最优方案(附源代码)
Xml作为数据存储的一种方式,当数据非常大的时候,我们将碰到很多Xml处理的问题。通常,我们对Xml文件进行编辑的最直接的方式是将xml文件加载到XmlDocument,在内存中来对XmlDocument进行修改,然后再保存到磁盘中。这样的话我们将不得不将整个XML document 加载到内存中,这明显是不明智的(对于大数据XML文件来说,内存将消耗很大,哥表示鸭梨很大)。下面我们将要讲的是如何高效的增加内容(对象实体内容)到xml日志文件中。
(一)设计概要
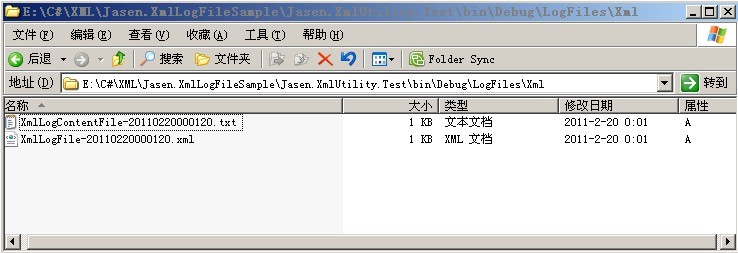
总体来说,我们将(通过代码)创建两种不同的文件,第一种为Xml文件,第二种为xml片段(txt文件),如下图所示:
我们通过如下的定义来使2个不同的文件相关联。
<!ENTITY yourEntityRefName  SYSTEM
"your xml fragement address(relative or obsolute address) ">
(二)xml文件的生成
先来看下如何创建相关的xml文件,代码如下:
{
stringdocType= string.Format("\n<!DOCTYPEXmlLogFile\n[\n<!ENTITY{0}SYSTEM\"{1}\">\n]>\n",entityRef,xmlLogContentFileName);
XmlWriterSettingswrapperSettings=newXmlWriterSettings()
{
Indent=true
};
using(XmlWriterwriter=XmlWriter.Create(xmlLogFilePath,wrapperSettings))
{
writer.WriteStartDocument();
writer.WriteRaw(docType);
writer.WriteStartElement(ConfigResource.XmlLogFile);
writer.WriteStartElement(ConfigResource.XmlLogContent);
writer.WriteEntityRef(entityRef);
writer.WriteEndElement();
writer.WriteEndElement();
writer.Close();
}
}
对xml文件内容的写入主要通过XmlWriter来进行操作的。这个方法比较简单,不再讲解,看下我们通过这个方法生成的文件内容:
<!DOCTYPEXmlLogFile
[
<!ENTITYLocationsSYSTEM"XmlLogContentFile-20110220000120.txt">
]>
<XmlLogFile>
<XmlLogContent>&Locations;</XmlLogContent>
</XmlLogFile>
Locations为实体引用名称,与之相对应的为&Locations; 。
XmlLogContentFile-20110220000120.txt为Xml片段的文件名称,路径是相对于XmlLogFile-20110220000120.xml的。
&Locations;相当于占位符的作用,将用XmlLogContentFile-20110220000120.txt文件的内容来替换XmlLogFile-20110220000120.xml的&Locations;
(三)Xml片段文件的生成
Xml片段文件的生成过程思路为:通过System.IO.FileStream和System.Xml.XmlWriter在文件的末尾处增加文件的内容(效率较高,因为是直接在文件的末尾添加的内容),内容格式为Xml,其中涉及到反射的部分内容。
{
using(FileStreamfileStream=newFileStream(xmlLogContentFilePath,FileMode.Append,
FileAccess.Write,FileShare.Read))
{
XmlWriterSettingssettings=newXmlWriterSettings()
{
ConformanceLevel=ConformanceLevel.Fragment,
Indent=true,
OmitXmlDeclaration=false
};
WriteContent(logObject,fileStream,settings);
}
}
privatestaticvoidWriteContent(objectlogObject,FileStreamfileStream,XmlWriterSettingssettings)
{
using(XmlWriterwriter=XmlWriter.Create(fileStream,settings))
{
Typetype=logObject.GetType();
writer.WriteStartElement(type.Name);
writer.WriteAttributeString(ConfigResource.Id,logObject.GetHashCode().ToString());
if(logObject.GetType().IsPrimitive||
(logObject.GetType()==typeof(string)))
{
writer.WriteElementString(logObject.GetType().Name,logObject.ToString());
}
else
{
PropertyInfo[]infos=type.GetProperties();
foreach(PropertyInfoinfoininfos)
{
if(ValidateProperty(info))
{
writer.WriteElementString(info.Name,
(info.GetValue(logObject,null)??string.Empty).ToString());
}
}
}
writer.WriteEndElement();
writer.WriteWhitespace("\n");
writer.Close();
}
}
{
return info.CanRead && (info.PropertyType.IsPrimitive
|| (info.PropertyType == typeof(string))
|| (info.PropertyType == typeof(DateTime)
|| (info.PropertyType == typeof(DateTime?))));
}
代码
writer.WriteAttributeString(ConfigResource.Id,logObject.GetHashCode().ToString());

                if (logObject.GetType().IsPrimitive ||
                (logObject.GetType() == typeof(string)))
                {
                    writer.WriteElementString(logObject.GetType().Name, logObject.ToString());
                }
第一行为该实体增加一个Id特性,采用对象的哈希值来进行赋值,方便以后的单元测试(通过对象的哈希值来查找相应的Xml内容)。
余下的几行为:当实体的类型是基元类型或者字符串类型的时候,直接通过writer.WriteElementString()方法将类型名称,实体对象值作为参数直接写入xml片段文件中。
否则
 else
                {
                    PropertyInfo[] infos = type.GetProperties();
                    foreach (PropertyInfo info in infos)
                    {
                        if (ValidateProperty(info))
                        {
                            writer.WriteElementString(info.Name,
                                (info.GetValue(logObject, null) ?? string.Empty).ToString());
                        }
                    }
                }
通过反射来获取所有属性相对应的值,其中属性必须是可读的,并且为(基元类型,string,DateTiem?,DateTime)其中一种(这个大家可以扩展一下相关功能)。
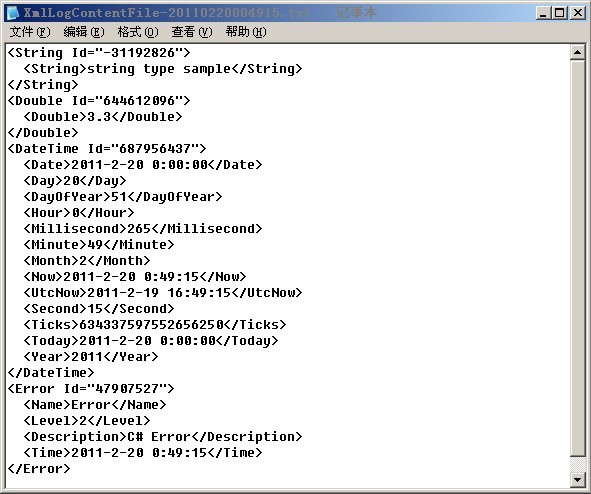
如下所示,我们通过基元类型float,字符串类型string,对象类型Error【Point为Error的属性,不是(基元类型,string,DateTiem?,DateTime)其中一种】来进行测试。
XmlLogHelper.Write(3.3);
XmlLogHelper.Write(DateTime.Now);
Errorerror=newError()
{
Time=DateTime.Now,
Point=newSystem.Drawing.Point(0,0),
Description="C#Error",
Level=2,
Name="Error"
};
XmlLogHelper.Write(error);
输出内容如下:
(四)采用lock来避免异常的发生,其次特别要注意对资源的及时释放。
publicstaticvoidWrite(objectlogObject)
{
if(logObject==null)
{
return;
}
lock(lockObject)
{
Writing(logObject);
}
}
privatestaticvoidWriting(objectlogObject)
{
stringentityRef=ConfigResource.EntityRef;
stringbaseDirectory=InitDirectory();
stringbaseName=DateTime.Now.ToString("yyyyMMddHHmmss");
stringxmlLogFilePath=Path.Combine(baseDirectory,string.Format(ConfigResource.XmlLogFileName,baseName));
XmlLogHelper.XmlFilePath=xmlLogFilePath;
stringxmlLogContentFileName=string.Format(ConfigResource.XmlLogContentFileName,baseName);
stringxmlLogContentFilePath=Path.Combine(baseDirectory,xmlLogContentFileName);
if(!File.Exists(xmlLogFilePath))
{
InitXmlFile(xmlLogFilePath,xmlLogContentFileName,entityRef);
}
InitEntityRefFile(xmlLogContentFilePath,logObject,entityRef);
}
采用lock来避免同时对文件进行操作,避免异常的发生,保证每次操作都是仅有一个在进行。
          lock (lockObject)
            {
                Writing(logObject);
            }
采用using来及时释放掉资源。
  using (FileStream fileStream = new FileStream(xmlLogContentFilePath,  FileMode.Append,
                FileAccess.Write, FileShare.Read))
            {

             }
(五)单元测试
单元测试的主要代码如下,主要是对Write()方法进行测试,如下:
publicvoidWriteTest()
{
DeleteFiles();//删除目录下所有文件,避免产生不必要的影响。
List<Error>errors=InitErrorData(9);
AssertXmlContent(errors);
}
privatestaticvoidAssertXmlContent(List<Error>errors)
{
foreach(Errorerrorinerrors)
{
XmlLogHelper.Write(error);
XmlDocumentdoc=GetXmlDocument();
XmlNodenode=doc.SelectSingleNode("//Error[@Id='"+error.GetHashCode().ToString()+"']");
Assert.IsTrue(node.Name==typeof(Error).Name);
stringpath=string.Format("//Error[@Id='{0}']//",error.GetHashCode().ToString());
XmlNodelevelNode=doc.SelectSingleNode(path+"Level");
XmlNodenameNode=doc.SelectSingleNode(path+"Name");
XmlNodedescriptionNode=doc.SelectSingleNode(path+"Description");
XmlNodetimeNode=doc.SelectSingleNode(path+"Time");
XmlNodepointNode=doc.SelectSingleNode(path+"Point");
Assert.IsTrue(nameNode.Name=="Name");
Assert.IsTrue(levelNode.Name=="Level");
Assert.IsTrue(descriptionNode.Name=="Description");
Assert.IsTrue(timeNode.Name=="Time");
Assert.IsNotNull(levelNode);
Assert.IsNotNull(nameNode);
Assert.IsNotNull(descriptionNode);
Assert.IsNotNull(timeNode);
Assert.IsNull(pointNode);
Assert.IsTrue(nameNode.InnerText==(error.Name??string.Empty));
Assert.IsTrue(levelNode.InnerText==error.Level.ToString());
Assert.IsTrue(timeNode.InnerText==DateTime.MinValue.ToString());
Assert.IsTrue(descriptionNode.InnerText==(error.Description??string.Empty));
}
}
上面仅仅是针对一个自定义的Error类进行了验证................
(六)其他应用
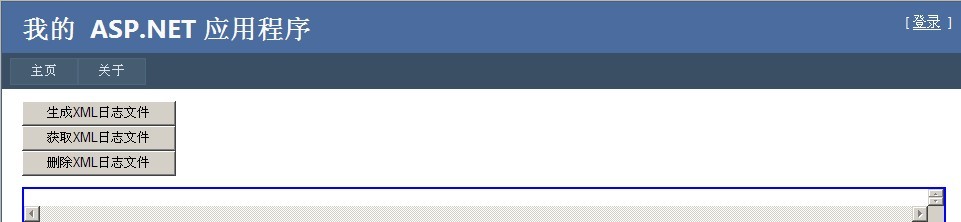
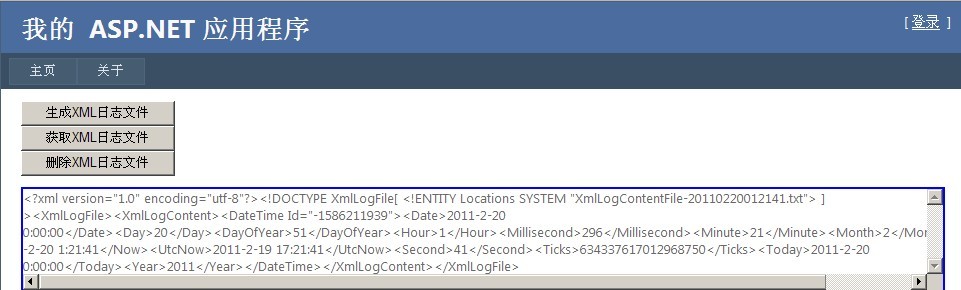
当我们的Xml日志文件可以记录的时候,我们可能想通过界面来看下效果,比如如下所示意的图中,点击【生成XML日志文件】,再点击【获取XML日志文件】的时候,我们能够看到生成的XML日志文件。
其中生成的文件名称显示如下:

多次点击【生成XML日志文件】,再点击【获取XML日志文件】的时候,我们能够看到生成的XML日志文件数量也递增(因为我将文件的名称设置为string baseName = DateTime.Now.ToString("yyyyMMddHHmmss");,按照秒数来计算的)。点击任何一个文件,将显示该文件的相关全部xml内容(包括xml文件和xml片段)。

点击【删除XML日志文件】将删除所有的xml文件,如下:
(七)总结
对于流的操作来说,应尽快释放掉系统资源,促使GC的Finalize()方法的执行,同时可以避免异常的发生。对于Xml日志来说,当数据量越来越大的时候,我们可以将内容分为两部分,一部分为标准的哦xml文件,另一部分为xml片段文件。
这样,我们能够在xml片段文件中方便地在文件末尾处增加相关的内容,这种效率是非常快的,而通常我们通过XMLDocument来加载数据非常消耗内存,效率较低(数据量越大越明显)。同时在读取xml文件的时候也会通过实体引用将相关的xml片段引用进来,从而使二个文件成为一个整体。再次,在将对象转换成xml的时候,通过反射来获取相关的数据,并将数据写入xml格式中,这个地方还有提高。希望各位在看完此文后也能熟练的运用XML日志文件来对日志进行记录。
