一句代码实现批量数据绑定[上篇]
对于一个以数据处理为主的应用中的UI层,我们往往需要编写相当多的代码去实现数据绑定。如果界面上的控件和作为数据源的实体类型之间存储某种约定的映射关系,我们就可以实现批量的数据绑定。为了验证这种想法,我写了一个小小的组件。这个小玩意仅仅是我花了两个小时写的,其中还有很多问题没有解决,比如对于空值的处理,特殊控件属性值的HTML编码问题,以及频繁反射的性能问题,仅仅演示一种解决思路而已。本篇着重介绍如何通过这个组件来解决我们在进行数据绑定过程中的常见问题,下篇会介绍它的设计。[源代码从这里下载]
目录:
一、基于控件ID/实体属性名映射的数据绑定
二、一句代码实现批量数据绑定
三、修正绑定数据的显示格式
四、过滤不需要绑定的属性
五、多个控件对应同一个实体属性
一、基于控件ID/实体属性名映射的数据绑定
我的这个组件暂时命名为DataBinder好了(注意和System.Web.UI.DataBinder区分),我们用它来将一个实体对象绑定给指定的容器控件中的所有子控件。下面是DataBinder的定义,两个BindData方法实现具体的绑定操作。
public class DataBinder
{
    public event EventHandler<DataBindingEventArgs> DataItemBinding;
    public event EventHandler<DataBindingEventArgs> DataItemBound;

    public static IEnumerable<BindingMapping> BuildBindingMappings(Type entityType, Control container, string suffix = "");

    public void BindData(object entity, Control container, string suffix = "");
    public void BindData( object entity,IEnumerable<BindingMapping> bindingMappings);
}
本文开头所说,自动批量的数据绑定依赖于控件和作为数据源实体类型的映射关系。在这里,我直接采用控件ID和实体属性名之间的映射。也就是说,在对于界面上控件进行命名的时候,应该根据对应的实体类型属性名进行规范命名。
另一方面,作为数据源的对象来说,它的所有属性并不都是为数据绑定而涉及。为了让DataBinder能够自动筛选用于绑定的属性,我在相应的属性上应用了一个自定义特性:DataPropertyAttribute。比如,下面的Customer对象会在后续的演示中用到,它的每一个数据属性都应用了这样一个DataPropertyAttribute特性。
public class Cutomer
{
    [DataProperty]
    public string ID { get; set; }
    [DataProperty]
    public string FirstName { get; set; }
    [DataProperty]
    public string LastName { get; set; }
    [DataProperty]
    public string Gender { get; set; }
    [DataProperty]
    public int? Age { get; set; }
    [DataProperty]
    public DateTime? BirthDay { get; set; }
    [DataProperty]
    public bool? IsVip { get; set; }
}
二、一句代码实现批量数据绑定
现在我们就来演示如何通过我们定义的DataBinder实现“一句代码的数据批量绑定”,而作为数据源就是我们上面定义的Customer对象。我们先来设计我们的页面,下面是主体部分的HTML,这是一个表格。需要注意的是:所有需要绑定到Customer对象的空间都和对应的属性具有相同的ID。
<table>
 <tr>
     <td style="width:20%;text-align:right">ID:</td>
     <td><asp:Label ID="ID" runat="server"></asp:Label></td>
 </tr>
  <tr>
     <td style="width:20%;text-align:right">First Name:</td>
     <td><asp:TextBox ID="FirstName" runat="server"></asp:TextBox></td>
 </tr>
  <tr>
     <td style="width:20%;text-align:right">Last Name:</td>
     <td><asp:TextBox ID="LastName" runat="server"></asp:TextBox></td>
 </tr>
  <tr>
     <td style="width:20%;text-align:right">Gender:</td>
     <td>
         <asp:RadioButtonList ID="Gender" runat="server" RepeatDirection="Horizontal">
             <asp:ListItem Text="Male"   Value = "Male" />
             <asp:ListItem Text="Female" Value = "Female" />
         </asp:RadioButtonList>
     </td>
 </tr>
 <tr>
     <td style="width:20%;text-align:right">Age:</td>
     <td><asp:TextBox ID="Age" runat="server"></asp:TextBox></td>
 </tr>
 <tr>
     <td style="width:20%;text-align:right">Birthday:</td>
     <td><asp:TextBox ID="Birthday" runat="server" Width="313px"></asp:TextBox></td>
 </tr>
  <tr>
     <td style="width:20%;text-align:right">Is VIP:</td>
     <td><asp:CheckBox ID="IsVip" runat="server"></asp:CheckBox></td>
 </tr>
 <tr>
     <td colspan="2" align="center">
         <asp:Button ID="ButtonBind" runat="server" Text="Bind" onclick="ButtonBind_Click" />
     </td>
 </tr>
</table>
为了编成方便,将DataBinder对象作为Page类型的一个属性,该属性在构造函数中初始化。
public partial class Default : System.Web.UI.Page
{
    public Artech.DataBinding.DataBinder DataBinder { get; private set; }
    public Default()
    {
        this.DataBinder = new Artech.DataBinding.DataBinder();
    }
}
然后我将数据绑定操作实现的Bind按照的Click事件中,对应所有的代码如下所示——真正的用于数据绑定的代码只有一句。
protected void ButtonBind_Click(object sender, EventArgs e)
{
    var customer = new Customer
    {
        ID          = Guid.NewGuid().ToString(),
        FirstName   = "Zhang",
        LastName    = "San",
        Age         = 30,
        Gender      = "Male",
        BirthDay    = new DateTime(1981, 1, 1),
        IsVip       = true
    };
    this.DataBinder.BindData(customer, this);
}
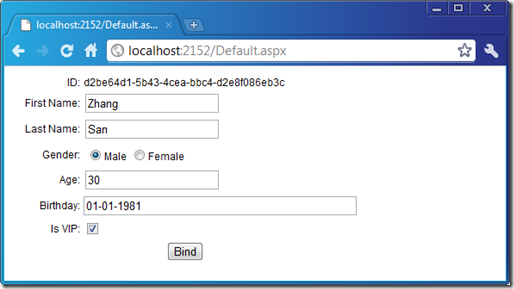
在浏览器中打开该Web页面,点击Bind按钮,你会发现绑定的数据已经正确显示在了对应的控件中:
虽然通过DataBinder实现了对多个控件的批量绑定,但是并不完美。一个显著的问题是:作为生日的字段不仅仅显示了日期,还显示了时间。我们如何让日期按照我们要求的格式进行显示呢?DataBinder为了提供了三种选择。
如果你注意看DataBinder定义了,你会发现它定义了两个事件:DataItemBinding和DataItemBound(命名有待商榷),它们分别在对某个控件进行绑定之前和之后触发。我们的第一种方案就是注册DataItemBinding时间,为Birthday指定一个格式化字符串。假设我们需要的格式是“月-日-年”,那么我们指定的格式化字符串:MM-dd-yyyy。事件注册我方在了Page的构造函数中:
public Default()
{
    this.DataBinder = new Artech.DataBinding.DataBinder();
    this.DataBinder.DataItemBinding += (sender, args) =>
        {
            if (args.BindingMapping.Control == this.Birthday)
            {
                args.BindingMapping.FormatString = "MM-dd-yyyy";
            }
        };
}
运行程序,你会发现作为生日的字段已经按照我们希望的格式显示出来:
上面介绍了通过注册DataItemBinding事件在绑定前指定格式化字符串的解决方案,你也可以通过注册DataItemBound事件在绑定后修正显示的日期格式,相应的代码如下:
public Default()
{
    this.DataBinder = new Artech.DataBinding.DataBinder();
    this.DataBinder.DataItemBound += (sender, args) =>
        {
            if (args.BindingMapping.Control == this.Birthday && null != args.DataValue)
            {
                this.Birthday.Text = ((DateTime)Convert.ChangeType(args.DataValue, typeof(DateTime))).
                    ToString("MM-dd-yyyy");
            }
        };
}
DataBinder定义了两个BindData重载,我们使用的是通过指定数据源和容器控件的方式,而另一个重载的参数为IEnumerable<BindingMapping>类型。而BindingMapping是我们自定义的类型,用于表示控件和实体属性之间的运行时映射关系。而这样一个BindingMapping集合,可以通过DataBinder的静态方法BuildBindingMappings来创建。BindingMapping具有一个FormatString表示格式化字符串(实际上面我们指定的格式化字符串就是为这个属性指定的)。那么,我们也可以通过下面的代码来进行数据绑定:
protected void ButtonBind_Click(object sender, EventArgs e)
{
    var customer = new Customer
    {
        ID          = Guid.NewGuid().ToString(),
        FirstName   = "Zhang",
        LastName    = "San",
        Age         = 30,
        Gender      = "Male",
        BirthDay    = new DateTime(1981, 1, 1),
        IsVip       = true
    };
    var bindingMappings = Artech.DataBinding.DataBinder.BuildBindingMappings(typeof(Customer), this);
    bindingMappings.Where(mapping => mapping.Control == this.Birthday).First().FormatString = "MM-dd-yyyy";
    this.DataBinder.BindData(customer, bindingMappings);
}
四、过滤不需要绑定的属性
在默认的情况下,第一个BindData方法(指定容器控件)会遍历实体的所有属性,将其绑定到对应的控件上。可能在有的时候,对于某些特殊的属性,我们不需要进行绑定。比如,某个控件的ID虽然符合实体属性的映射,但是它们表示的其实根本不是相同性质的数据。
为了解决在这个问题,在BindingMapping类型中定义了一个布尔类型的AutomaticBind属性。如果你在绑定前将该属性设置成False,那么基于该BindingMapping的数据绑定将被忽略。如果你调用BindData(object entity, Control container, string suffix = "")这个重载,你可以通过注册DataItemBinding事件将相应BindingMapping的AutomaticBind属性设置成False。如果你调用BindData( object entity,IEnumerable<BindingMapping> bindingMappings)这个重载,你只需要在调用之间将相应BindingMapping的AutomaticBind属性设置成False。
我们将我们的程序还原成最初的状态,现在通过注册BindingMapping事件将基于Birthday的BindingMapping的AutomaticBind属性设置成False:
public Default()
{
    this.DataBinder = new Artech.DataBinding.DataBinder();
    this.DataBinder.DataItemBinding += (sender, args) =>
        {
            if (args.BindingMapping.Control == this.Birthday)
            {
                args.BindingMapping.AutomaticBind = false;
            }
        };
}
程序执行后,Birthday对应的TextBox将不会被绑定:
在上面的例子中,我们的控件的ID和对应的实体属性是相同的。但是在很多情况下,相同的页面上有不止一个控件映射到实体的同一个属性上。而控件ID的唯一性决定了我们不能为它们起相同的ID。在这种情况下,我们采用“基于后缀”的映射。也就是为,在为控件进行命名的时候,通过“实体属性名+后缀”形式来指定。
如果你仔细看了DataBinder的定义,不论是实例方法BindData(接受Control类型参数的),还是静态方法BuildBindingMappings,都具有一个缺省参数suffix,这就是为这种情况设计的。在默认的情况下,这个参数的值为空字符串,所以我们需要控件和实体属性具有相同的名称。如果控件是基于“实体属性名+后缀”来命名的,就需要显式指定这个参数了。为了演示这种情况,我们将例子中的所有需要绑定的空间ID加上一个“_Xyz”字符作为后缀。
<table>
 <tr>
     <td style="width:20%;text-align:right">ID:</td>
     <td><asp:Label ID="ID_Xyz" runat="server"></asp:Label></td>
 </tr>
  <tr>
     <td style="width:20%;text-align:right">First Name:</td>
     <td><asp:TextBox ID="FirstName_Xyz" runat="server"></asp:TextBox></td>
 </tr>
  <tr>
     <td style="width:20%;text-align:right">Last Name:</td>
     <td><asp:TextBox ID="LastName_Xyz" runat="server"></asp:TextBox></td>
 </tr>
  <tr>
     <td style="width:20%;text-align:right">Gender:</td>
     <td>
         <asp:RadioButtonList ID="Gender_Xyz" runat="server" RepeatDirection="Horizontal">
             <asp:ListItem Text="Male"   Value = "Male" />
             <asp:ListItem Text="Female" Value = "Female" />
         </asp:RadioButtonList>
     </td>
 </tr>
 <tr>
     <td style="width:20%;text-align:right">Age:</td>
     <td><asp:TextBox ID="Age_Xyz" runat="server"></asp:TextBox></td>
 </tr>
  <tr>
     <td style="width:20%;text-align:right">Birthday:</td>
     <td><asp:TextBox ID="Birthday_Xyz" runat="server" Width="313px"></asp:TextBox></td>
 </tr>
  <tr>
     <td style="width:20%;text-align:right">Is VIP:</td>
     <td><asp:CheckBox ID="IsVip_Xyz" runat="server"></asp:CheckBox></td>
 </tr>
 <tr>
     <td colspan="2" align="center">
         <asp:Button ID="ButtonBind" runat="server" Text="Bind" onclick="ButtonBind_Click" />
     </td>
 </tr>
</table>
如果采用指定容器控件进行直接绑定的话,就可以这样编程:
protected void ButtonBind_Click(object sender, EventArgs e)
{
    var customer = new Customer
    {
        ID          = Guid.NewGuid().ToString(),
        FirstName   = "Zhang",
        LastName    = "San",
        Age         = 30,
        Gender      = "Male",
        BirthDay    = new DateTime(1981, 1, 1),
        IsVip       = true
    };
    this.DataBinder.BindData(customer, this, "_Xyz");
}
如果通过预先创建的BindingMapping集合进行数据绑定,那么代码将是这样:
protected void ButtonBind_Click(object sender, EventArgs e)
{
    var customer = new Customer
    {
        ID          = Guid.NewGuid().ToString(),
        FirstName   = "Zhang",
        LastName    = "San",
        Age         = 30,
        Gender      = "Male",
        BirthDay    = new DateTime(1981, 1, 1),
        IsVip       = true
    };

    var bindingMappings = Artech.DataBinding.DataBinder.BuildBindingMappings(typeof(Customer), this, "_Xyz");
    this.DataBinder.BindData(customer, bindingMappings);
}


